Wednesday 20 April 2011

Franco Prussian Game

Narrative of Franco Prussian Game


Fought at: ‘The Redwood Redoubt’ 

General Bourdon on the eve of battle


Participants


Prussians: General Baron Von Powell, General Baron Freyer Von Martin

French:   General Rodger Wood, General Gavin Bowden

Rules:        Volley & Bayonet

Scale:      15mm (Mostly Essex figures) from Adrian’s and Rodger's vast arsenals of lead armies.

Introduction
The French Republican Commander is tasked with defending the boundary of a wide river that bisects the centre of the table length-ways from East to West. The river is only crossable at any of the five bridges, which are relatively evenly spaced along its length. There are also three towns similarly spaced. Their objective is to prevent the Prussians from crossing the river and to hold at least three of the bridges and two towns at end of turn 8. (Signalling nightfall)

The Prussians must capture at least one of the towns and get all their forces across the river before nightfall.

Forces:
The French Army consists of four infantry Divisions, most of which are somewhat inferior troops, including the much-derided Guard Mobiles. The exception being the Division of Marines, who are veteran shock troops. They also have the usual complement of guns and a Mitralleuse section plus two Army guns. The French also have the advantage of six trench-works which they can deploy as they feel necessary. Hopefully this will compensate for their lack of quality troops.

The Prussian Army, although smaller in actual numbers, is its usual efficient self and comprises mainly veteran campaigners, a large artillery train and a unit of Uhlans. There is also a Bavarian contingent not yet arrived.


The battlefield from the French side


Battle Narrative:

Rather than give a turn by turn account of every dice roll and move, which will bore the bejeebers out of even the most hard core among you, I will recount the main points and events of the battle as I recall them. I apologise if my recollection of events varies too much from my fellow participants.


Turn 1, Deployment:
The French, realising they can't effectively defend the whole river, choose to weight their defence on the left flank sensing that this will be the Prussian Line of Advance as it offers the least obstacles and provides good going for infantry. They occupy the towns on their left flank and centre and dig in around the three bridges starting from East to West. They also dig in around the woods that border the river and near the centre.  They decide to keep their best troops (the Marines) in the rear, in reserve near the centre to bolster whichever sector shows signs of breaking whilst using their lesser troops as frontline cannon fodder. 

The French centre

The Prussians, whilst arriving as the French expected, opt to make the main thrust of their attack against the weaker French right flank whilst softening up the French centre with the bulk of their artillery.
The Prussians take full advantage of the high ground to position their artillery in massed batteries to pummel the enemy trenches. 

Prussian artillery bombarding the French entrenchments

Turn 2

The Prussian attack begins with a heavy sustained barrage which falls with unerring accuracy on the French frontline trenches near the centre bridge, scoring no less than ‘nine hits’ of which the hapless French only manage to save two.

The French respond with a cannonade but to little effect. At this range their Chassepot rifles are of little use as well.

Turn 3

The Prussian infantry continue their advance to the centre and French right flank whilst the Bavarians arrive on the same flank and begin an unopposed crossing of the river at the unguarded bridge. The Prussian Uhlans gallop over the bridge in grand style with the intention of outflanking the French and threatening their rear …most unpleasant for the French I’m sure.
Prussian Uhlans lurking in the rear

Turn 3

The Prussians begin their assault on the central bridge, but as they come within range, the French Chassepot rifle really comes into effect. A well-aimed volley from the stationary and entrenched Frenchmen scythes through the Prussian ranks and their attack falters. The Prussians are stunned by the accuracy and rate of fire the so-called ‘inferior’ troops are pouring into them and they retreat out of range and go to ground.
The Prussians are forced to go to ground 

Turn 4

The French, realising they have been wrong footed, withdraw the bulk of their troops and artillery from the uncontested Left flank leaving a token force to hold the town and bridge whilst moving to shore up the centre and right flank. Aware that the Bavarians have crossed the river and are rapidly advancing on their right flank they position troops on the high ground to the right of the centre wood with the intention of refusing the flank. Where are those damned Uhlans heading for they wonder?

The Prussians ponder another bombardment but decide they need to move their guns forward in the centre where they hope to wear the defenders down by shear weight of shot!

They are forced to rethink their infantry assault on the centre and decide to shift their attack to the now lightly defended French Left. You have to admire quality of command and training that allows the Prussians such flexibility.


They throw a division forward to the bridge with a number of guns in support.

Prussians assault the French Left flank

Turn 5

The Bavarians, hoping to drive-in the French Right flank, bravely charge up the heavily defended slope but suffer the same fate as their compatriots and are thrown back by a telling French fusillade. The French gain a breather to allow reserves from the centre to rush to their aid.

The Bavarians decide to go to ground at the base of the slopes and try to whittle the defenders down by fire from their needle guns.

The Bavarian Flank Attack


The Prussian Uhlans sensing the attack is in the balance launch a perfectly timed flank charge on the French reinforcements. Caught in the open and unprepared the Frenchmen are ridden down in grand style and destroyed. The Uhlans are now free to harass the French rear at will once their mounts have recovered.
Those damned Uhlans again!


On the French Left flank the Prussians assault the lightly defended bridge but once again the awesome short-range firepower of the French Chassepot is too much for them and they stream back across the bridge dragging their wounded and bleeding comrades. The Prussian gunners un-limber and proceed to bring down accurate fire on the French entrenchments with their Krupp breech-loaders in retaliation.


Turns 6 & 7

The Bavarians again assault the heights and succeed this time in pushing the harassed Frenchmen off the hill whilst the gallant Uhlans launch another dashing attack on the French reserve troops that throws the somewhat surprised Marines back in confusion. “Lancers were never meant to be this good,” they mutter in Gallic consternation.


With nightfall approaching, the Prussians launch another desperate assault on the French Left flank bridge. Their accurate counter battery fire has destroyed all the enemy’s artillery including the mitrallieus and the shell-shocked French defenders are nearing exhaustion. The Prussian infantry storm over the bridge and easily overwhelm both the bridge entrenchments and the adjacent town.

Prussian Guards advancing

Turn 8
The Prussians are now in possession of all but one of the bridges (Centre bridge) and have taken two of the towns. Two of their commands are seriously depleted but still capable of fighting. With all their available forces surrounding the exhausted French centre and with cavalry and Bavarian troops attacking the French rear unhindered it is clear the Prussians have won the day. The French have taken a beating with all their commands near or in collapse and casualties mounting by the second.

Its time to concede defeat and try to extricate what’s left of this shattered army.


Conclusion.

Even though I was on the losing side I enjoyed this game immensely. The rules worked really well and allowed quite a complex game to be comfortably completed to a decisive conclusion in two and a half hours.
I thought the game was well balanced with Prussian troop quality and artillery firepower making up for smaller numbers and the quite daunting task of capturing so many objectives and the difficulties that river crossings under fire present.
The French whilst suffering from inferior troop quality did have very favourable ground to defend and the Veteran Marines may have been better deployed in the front line where their staying power could delay the Prussian advance longer.
This game was a sobering lesson in the effect of modern ordnance on exposed formations and frontal assaults over open ground.


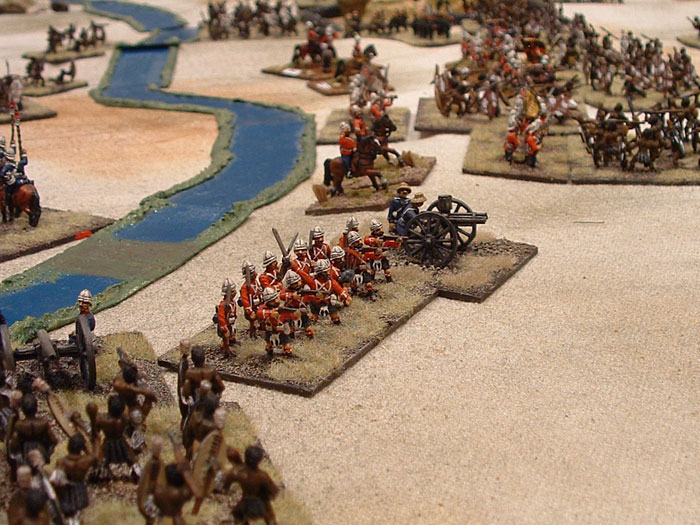
Bavarians cross the river to launch a surprise assault on the French flank.
Prussians on the move.
Prussian cavalry.
                                         The above buildings are all hand made by Adrian.


Tuesday 19 April 2011

Historic Images of the Southern Strategists

 
Conquest 2003

Conquest 2003


Train Show 2005 A.W.I


Train Show 2005  A.C.W.


Conquest 2005


Conquest 2007


NatCon 2008

Conquest 2008


Conquest 2008


NatCon 2008
Conquest 2010

Conquest 2010


Over the years the boys have produced many demo games at Conquest, as well as the National Wargames Convention (when held in Christchurch), and on one occasion at the Big Little Railway Convention. We always try to put together something original that is colourful and that will hopefully gain the interest of others. These games have varied from Seven Years War in 15mm, Napoleonics in 15mm and 25/28mm, American Civil War, American War of Independence, English Civil War and Zulu War in 25/28mm. We put a strong emphasis on the terrain matching the quality of the painted troops and we like to think that over the years we have improved the quality of both. One of the most pleasing aspects of demo games is interacting with the public and other members of the wargaming fraternity, explaining what the game represents and disgusing the various historical background, along with how we made the terrain. We also benefit from talking with others who are only too pleased to pass on to us numerous painting and model making tips. It's this interaction with like-minded people that make the hobby so enjoyable. From the photos we've attached you will be able to see that we also like to add a little spice to our presentations by dressing in period costume on the odd occasion to the amusement of those not so adventurous...it adds to the fun of it! 


Monday 11 April 2011

Reveille

This is the first posting (hence, the reveille title) of the Southern Strategist Wargaming Group blog. We are a small band of six middle-aged miniature warfare enthusiasts (with one 9-year old member of our Cadet Corps) based in Christchurch, New Zealand...a city where people have recently taken on the James Bond mantra of being 'shaken, not stirred.'

Our current group has been gaming together for over 13 years and hope to be doing so well into our retirement.
We meet for fortnightly games at the 'Redwood Redoubt' where a variety of periods are fought over from battles of ancient Rome through to the Vietnam conflict. Our scales of choice are usually 15 and 28mm battles, although we also use 20mm figures for World War Two encounters. We have recently been seduced into Napoleonic naval gaming in 1/700 scale.

We focus on providing enjoyable and well-presented social games where well-constructed terrain and beautifully  painted figures are more important than attitudes of 'win at all cost' type competition gaming. Our meetings are social occasions where we not only get to move our precious armies around, but take time out to  chat and have the odd ale and whiskey with like-minded fellows while discussing the latest figures releases and solving the problems of the world. It's such escapism that keeps us sane.

We are renowned for putting on visually innovative demonstration games at local wargaming conventions each year and pride ourselves on stimulating public interest in the hobby.

This blog has been created to record our gaming exploits and to share our efforts with fellow gamers around the world.We hope you enjoy the reports of our games that will be forthcoming and look forward to any comments you wish to make.

Tally Ho!          

Battle report of the Battle of the Nowongozeer River.

Private Stack (Befitting the occasion Wayne's son, Seamus, dressed accordingly).
The following is an account of a recent, fictitious, Zulu War engagement the lads from The Southern Strategists put together on one of their regular Wednesday night sessions. The occasion was particularly auspicious as it was the Grand Opening of Wayne's beautifully appointed, new war-games room, 'The Mess'
"The force is strong in this one". Master and young apprentice discuss tactics.

The game was fought using fellow Strategist, Adrian's, Colonial adaptation of the excellent Volley & Bayonet rules and the 15mm figures are predominantly Essex and Old Glory  from Adrian and Rodgers collection. Terrain was an old canvas drop cloth suitably spray painted, polystyrene hills and loose rocks etc.


Scenario
The scenario was based on the somewhat dubious premise that the local Zulu warlord, Chief Imfulajuju,  had captured a number of native irregular spies,.. actually rather fetching and well endowed maidens, highly skilled in the art of extracting vital information by use of their ample feminine charms. The chief is rather looking forward to an evening of torture and ritual disembowelment of said spies once he has availed himself of their particular talents!
Damsels in distress


It is the solemn duty of the Her Majesties forces to extricate these helpless agents and give those rotten Zulus a jolly good curry-up to boot.
With this delicate task at hand the Commander of Operations, Southern Transvaal District, Major General Sir Cedric Throckmorton, loses no time in ordering the assembling of the Nowongozeer Field Force under the command of Lieut-General Rupert Norgate-Ramsbottom V.C, 2ndGuards Regt.
This able and courageous veteran of the Ashanti Wars promptly marches his force to the Southern bank of the Nowongozeer River and within sight of the beastly Imfulajuju's villages. He Laagers his force and takes the wise precaution of doubling the pickets that night ready for the following mornings inevitable engagement.
Lieut-General Rupert Norgate-Ramsbottom V.C


As the first shafts of daylight pierce the morning mist the following situation presents itself to the General through the lens of his trusty telescope:

Lt-General Norgate-Ramsbottom gets the lie of the land.
 
The Zulu Villages are located on a relatively flat plain to the North of the Nowongozeer River.
The river is only fordable in two places, to the East and West. A number of large hills dominates the landscape to the North of the river.
The unfortunate captives can clearly be seen bound to stakes in the centre of the main village  looking somewhat worse for wear.
The Nowongozeer Plain


British briefing
Over a piping hot cup of tea and crumpets the General briefs his fellow officers on his plan of attack.
Rather than split his forces and use both crossing points to flank the main village he opts for the safer option of sending his entire force over the eastern crossing. Once across they will detach a raiding party to rescue the captives when the opportunity presents itself.  It is essential to keep his forces within command radius where they can maximise their fire power and provide support in the deadly hand to hand fighting that the Zulus are so adept at. He orders the Lancers to defend the baggage and cover his rear to protect his escape route back across the river. 

Turn 1 The game begins with an orderly  British crossing of the river, aided by the fact that the flow at this time of the year is moderate.
As the crossing proceeds the unmistakable and ominous sounds of Zulu Impi on the move can be heard in the distance.
Zulu Impi on the trot


The Zulus cover ground at an astonishing rate and the Brits barely manage to get across the river and formed up in good order before the Left Horn of the Zulu attack smashes into the Highlanders and the 9pdr on the right flank. Some indifferent dice throwing (nothing but ones & twos with seven dice!!) by the Brits fails to stall the native attack and the natives charge home. A ferocious melee ensues but the Gunners and Highlanders prevail and the natives are recoiled in disorder. In the centre The Zulu Chest slams into the Brits in similar style but discipline holds and the natives are recoiled a half move. All the while native reserves are arriving in an endless brown tide.

 Turn 2 and the Zulus intentions are revealed. They plan to assault the Brits on all fronts using their superior numbers and prowess in melee to overwhelm the enemy. Meanwhile a large force of natives have crossed the River on the unguarded Brit left flank and are making for the baggage. Let's hope the Lancers can stop em.
The Zulu Right Horn are soon within striking distance of the Brit left flank covered by the Light Infantry (60th Rifles)and Native Irregulars (Frontier Light Horse).
Turn 3 sees the Zulus press home their assaults on all fronts and the Brits are hard pressed to hold them, but this time disciplined fire power in the form of some rather more acceptable dice throwing and the fact that the Brits are now stationery, hence extra dice, means the Zulus take a walloping. The Naval types have got the Gatling going in grand style as well and again the Zulus are repulsed on all fronts.     Time for a wee dram of Speyside's finest malt to settle the nerves methinks.


The Zulu's superiority in numbers means they can soak up a lot of punishment, recoil, rally and go back in again. A lot of thought on Adrian's part has made for a reasonably balanced adaptation of the rules which gives the Natives a fair crack, especially once they close with the enemy, whilst still acknowledging the Brits advantage in firepower and discipline.
Turn 4 and the Brit Light Infantry seize the opportunity, whilst the natives are  distracted, to make a mad dash for the village and rescue the womenfolk who have inexplicably been left unguarded, no doubt Chief Imfulajuju is suitably enraged that the English Pig Dogs have ruined his evening's entertainment.
Some outstanding melee dice from the Zulus sees a British unit over-run and, with the river at their backs, they are cut down almost to man. It is a miracle that the Brits maintain control and manage to close up the gap. The Brits goal now is to stick together and make for the river crossing with the women in tow.


The sneaky Zulus on the South side of the river are maddeningly close to the baggage but fortunately  the Lancers have spotted them and are forming up for the charge.

17th Lancers


Turn 5 brings more of the same from the Zulus as they strive to overwhelm the Brits, however the River is actually proving to be an advantage  for the Brits as they are not forced to defend their rear and can make an orderly advance to the crossing point whilst still presenting a unified front and refusing their flank. The General refers to this as the 'Backs to the wall, half square shuffle'...I don't think you'll find it in any drill book though.
The Brits begin withdrawing their Artillery and the Gatling across the river to lend support to the Lancers whilst at the same time another unit is routed. . The Zulus however are having a hard time  of it as the Tommies pour volley after volley into their ranks. The Left Horn is exhausted and can no longer close with the enemy. It's going to be a near run thing but if the Brits can maintain order they may just pull it off. 


Turn 6 and the Brits are doing a fine job of getting themselves and their booty across the river whilst fending off the savage attacks of the Zulus.
'Ere they come again lads.


Across the river the Zulu raiding party has made it to the baggage and are about to make off with a case containing the General's whisky and cigars just as the Lancers burst amongst their ranks pennants flying and hooves pounding.  
The near demise of the General's whisky prompts another fortifying round of drinks for the weary Strategists before plunging headlong back into the fray...Damnably hot work this war-gaming and certainly not for the faint-hearted or weak-minded sort of chap! 

Gads!...The General's Whisky under threat.


Turn 7 Suitably fortified the Lancers press home their attack, but abysmal dice throwing sees them repulsed in disorder. Fortunately the Highlanders have arrived on the scene and, incensed at the thought of 'Heathens' getting their filthy mits on the 12 year old Maccallan, fix bayonets and prepare to charge. The sailors 9pdr has found the range and the Gatling's 'on song' as well, opting to use all 6 firing dice it cuts a deadly swathe through the wretched savages without jamming...unheard of in my Colonial war-gaming experience!
With the remainder of the Brit force safely across the river, the women folk in hand  and the Generals whisky out of harm's way the Zulus reluctantly conclude its time to call it a day.
Time for another dram and one of the Generals Havana's eh what?
This rather simple scenario turned out to be a spirited and thoroughly enjoyable encounter with much derogatory banter, cursing or cheering (depending on which side you're on)of failed morale throws and rubbish dice, everything that makes Colonial war-gaming such fun.
It's at times such as this one feels eternally grateful they haven't 'grown up' yet.


By Gavin ( just taking the pith) Bowden.