Pages

Sunday, 29 June 2014

Royal Navy hits the rocks

Last weeks game with the lads was a Napoleonic naval affair.

Set somewhere around some islands in the sunny Caribbean.

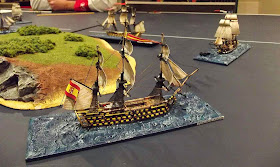
The British Royal Navy were sailing home, after several months at sea, commanded by Captain Ogilvie on board HMS Dreadnaught together with HMS Defiance and HMS Orion.

Looking through his telescope, Capt Ogilvie could see three ships directly ahead of his small fleet.

 He could see a French flag and a Spanish flag.
The British fleet.

 The two fleets were heading straight towards each other.
 As they passed many shots were fired with no serious damage being inflicted.
The Spanish ship Princine de Asturias leads from the Berwick and Le Redoutable

 The Royal Navy turn and now with the wind at their backs chase after the enemy.

 The French and Spanish ships split up. The Princine de Asturias turns to port, looking to go around the island. Le Redoutable went to starboard and turned through the eye of the wind to head back for another go at the British. The Berwick however carried on for a while before also turning and heading back toward the British fleet.

 It was at this point when things started going wrong for the British fleet. Capt Ogilvie run his ship onto the rocks!
 HMS Defiance following close behind only just managed to avoid the same fate. HMS Orion having seen HMS Dreadnaught run aground then decided to go around the island.
HMS Defiance and Le Redoutable exchange shots as they pass each other for a second time.

 Fire breaks out on Le Redoutable but is quickly put out.
The commander of the French ship "Le Redoutable" saw an opportunity for easy pickings and sailed his ship to the rear of the stricken British ship aground on the islands rocks.

Meanwhile behind the island the Spanish ship and HMS Orion pass each other with guns blazing!
The Spanish ship is on fire and now has to divert some crew from it's guns to help fighting fires. This allows HMS Orion to send in another volley as they pass.
HMS Defiance and Berwick trade shots as they also pass each other.
HMS Orion

The Princine de Asturias

HMS Orion joins in the fight with HMS Defiance against Berwick.  Together they take out the rudder of Berwick. She is now sailing away from the fight.
Meanwhile the French are still taking cheap shots on the poor old Royal Navy's HMS Dreadnaught.
And now here comes the Spanish to have a go as well.
HMS Defiance and HMS Orion both carry on, having seen the Berwick off, and head towards the damaged HMS Dreadnaught. The French and Spanish ships fire at the leading British ship, Orion, so effectively that all the crew are now either dead or so badly wounded that they are unable to carry on. HMS Orion drifts off into the sunset taking no more part in this fight. HMS Defiance decides that it is now time to make her escape.
The Berwick with no rudder and almost at the edge of the world!
So the Royal Navy had to abandon two of it's ships to the victorious French and Spanish navies.


Rumour has that Capt Ogilvie was the first one off the ship as soon as it hit the rocks. He was last seen running off with some of the local inhabitants.

Sunday, 15 June 2014

Dark Age Treachery.


Last weeks game was another Dark Age game this time using Geoff's modified LotR rules.

 Essentially a minor civil war. The loyalist troops want to crown their new king on the top of a mighty stone platform. The rebels have come with the plan of putting one of their own up to be king!


 To establish who would be who there was some dice rolling and some dealing of cards.

 Each player rolled a dice to determine which side he would be on, Rebel or Loyalist.

Then we rolled again to determine our own degree of loyalty to our respective causes.

With our degree of loyalty established we were then dealt cards. The most loyal on each side were giving one card down to the least likely to remain loyal who were given three cards. The cards were all the same colour for each side except for one. If you were the one that received the different coloured card you could swap sides when it suited by simply declaring that you were now fighting for the other side!! There were also some spare cards so that it was perfectly possible that no one would be a traitor and swap sides.


Above are the starting positions. Rebels on the left and the loyalists to the right.


 The joy of this game was that you had no idea who to trust.
 

 We all more or less advanced toward the centre of the table.
 Lots of joking and speculation as to who was the type to be a traitor etc.
 With the two sides almost about to meet in a massive brawl in the centre of the table the Rebel right wing warband declared he was fighting for the other side!! 
The traitors
 Here the new Rebel right wing warband has turned to face this new threat.
 Over the next move or two other warbands joined in on this melee.
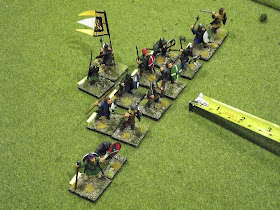
 Loyalist reserves await their chance to join in the fun.


Even the loyalist reserve has now entered the brawl.
 By this stage of the game, apart from a couple of archers, all but one of the Loyalist warbands were engaged in the melee along with all of the Rebels.
 Things were starting to go the Rebels way by now. Having dealt to the traitors on the right the Rebels we just starting to gain the upper hand in the centre when.....


.. the last Loyalist warband (that was rapidly moving towards the brawl)  declared for the Rebels! 
With the extra warband it was now only a matter of time until the Rebels would crown one of their own as the new King!


This is to show the crap that I have to put up with week after week trying to take photos of these games.


" It's hard to soar like an eagle when you play wargames with turkeys!!"


There is always plenty of banter within our group during our games and this type of game allowed for even more. None of us would trust each other and that made this game even more enjoyable.


Thanks to Geoff for running a great game and to Wayne for the drinks. Thanks also to Brad for supplying some of the figures.


Wednesday, 4 June 2014

Dark Age Hail Caesar

Last weeks game for the boys was a Dark Age Hail Caesar game.


A Viking army was arrayed along a ridge with a Norman army advancing toward them.


 The Vikings on the ridge.
 And the Normans advancing toward to the fields below the ridge.
 Viking command stand.
 The Normans had about twice as many mounted troops and these were positioned on the flanks of their foot troops.
 The Norman troops armed with bows and crossbows came forward to close the range and opened fire on the ridge.

 More foot troops coming up in support.

 The Vikings only had cavalry on their left flank and it wasn't long until they were engaged with the Norman cavalry opposite them.
 Outnumbered here as well the Vikings were slowly pushed back until their loses forced them from the field.
 Now the Norman cavalry on the other flank began their charge up the hill.
 The archers continued firing their arrows into the Vikings on the ridge.
 The Vikings not wanting to give up the high ground.


 Viking right flank command, and his handlers!
 Left flank Norman cavalry on the charge

 and smashing into the Vikings.

 pushing the Vikings back down the ridge.

 With both flanks now in trouble the Vikings in the centre left the ridge and advanced down onto the Normans below.
 Slowly they pushed the Normans back to the hedges.
 With darkness now falling it was getting too late for any advantages to be pressed further.
The Vikings were in control of the centre but both of the flanks belonged to the Normans.


A great game enjoyed by all.

Thanks to Tim for turning up and helping with the rules, Chris for running the game, supplying the figures and terrain and shouting the free beers being the host..